Spark NLP Cheatsheet
# Install Spark NLP from PyPI
pip install spark-nlp==6.4.1

# Install Spark NLP from Anaconda/Conda
conda install -c johnsnowlabs spark-nlp

# Load Spark NLP with Spark Shell
spark-shell --packages com.johnsnowlabs.nlp:spark-nlp_2.12:6.4.1

# Load Spark NLP with PySpark
pyspark --packages com.johnsnowlabs.nlp:spark-nlp_2.12:6.4.1

# Load Spark NLP with Spark Submit
spark-submit --packages com.johnsnowlabs.nlp:spark-nlp_2.12:6.4.1

# Load Spark NLP as external JAR after compiling and building Spark NLP by `sbt assembly`
spark-shell --jars spark-nlp-assembly-6.4.1.jar
GPU (optional):
Spark NLP 6.4.1 is built with ONNX 1.17.0 and TensorFlow 2.7.1 deep learning engines. The minimum following NVIDIA® software are only required for GPU support:
- NVIDIA® GPU drivers version 450.80.02 or higher
- CUDA® Toolkit 11.2
- cuDNN SDK 8.1.0
Scala 2.13
NOTE: PySpark from PyPI is based on Scala 2.12 by default, and you can use our Scala 2.12 version. If you need to start a Scala 2.13 instance, you can set the SPARK_HOME environment variable to a Spark Scala 2.13 installation, or install PySpark from the official Spark archives.
# Load Spark NLP with Spark Shell
spark-shell --packages com.johnsnowlabs.nlp:spark-nlp_2.13:6.4.1

# Load Spark NLP with PySpark
pyspark --packages com.johnsnowlabs.nlp:spark-nlp_2.13:6.4.1

# Load Spark NLP with Spark Submit
spark-submit --packages com.johnsnowlabs.nlp:spark-nlp_2.13:6.4.1

# Load Spark NLP as external JAR after compiling and building Spark NLP by `sbt assembly`
spark-shell --jars spark-nlp-assembly-6.4.1.jar
Python
Spark NLP supports Python 3.7.x and above depending on your major PySpark version.
NOTE: Since Spark version 3.2, Python 3.6 is deprecated. If you are using this python version, consider sticking to lower versions of Spark.
Quick Install
Let’s create a new Conda environment to manage all the dependencies there. You can use Python Virtual Environment if you prefer or not have any environment.
$ java -version
# should be Java 8 (Oracle or OpenJDK)
$ conda create -n sparknlp python=3.8 -y
$ conda activate sparknlp
$ pip install spark-nlp==6.4.1 pyspark==3.3.1
Of course you will need to have jupyter installed in your system:
pip install jupyter
Now you should be ready to create a jupyter notebook running from terminal:
jupyter notebook
Start Spark NLP Session from Python
Spark session for Spark NLP can be created (or retrieved) by using sparknlp.start():
import sparknlp
spark = sparknlp.start()
If you need to manually start SparkSession because you have other configurations and sparknlp.start() is not including them,
you can manually start the SparkSession with:
spark = SparkSession.builder \
    .appName("Spark NLP") \
    .master("local[*]") \
    .config("spark.driver.memory", "16G") \
    .config("spark.serializer", "org.apache.spark.serializer.KryoSerializer") \
    .config("spark.kryoserializer.buffer.max", "2000M") \
    .config("spark.driver.maxResultSize", "0") \
    .config("spark.jars.packages", "com.johnsnowlabs.nlp:spark-nlp_2.12:6.4.1") \
    .getOrCreate()
If using local jars, you can use spark.jars instead for comma-delimited jar files. For cluster setups, of course,
you’ll have to put the jars in a reachable location for all driver and executor nodes.
Python without explicit Pyspark installation
Pip/Conda
If you installed pyspark through pip/conda, you can install spark-nlp through the same channel.
Pip:
pip install spark-nlp==6.4.1
Conda:
conda install -c johnsnowlabs spark-nlp
PyPI spark-nlp package / Anaconda spark-nlp package
Then you’ll have to create a SparkSession either from Spark NLP:
import sparknlp

spark = sparknlp.start()
Quick example:
import sparknlp
from sparknlp.pretrained import PretrainedPipeline

# create or get Spark Session

spark = sparknlp.start()

sparknlp.version()
spark.version

# download, load and annotate a text by pre-trained pipeline

pipeline = PretrainedPipeline('recognize_entities_dl', 'en')
result = pipeline.annotate('The Mona Lisa is a 16th century oil painting created by Leonardo')
Scala and Java
To use Spark NLP you need the following requirements:
- Java 8 and 11
- Apache Spark 3.5.x, 3.4.x, 3.3.x, 3.2.x, 3.1.x, 3.0.x
Maven
spark-nlp on Apache Spark 3.0.x, 3.1.x, 3.2.x, 3.3.x, and 3.4.x
The spark-nlp has been published to
the Maven Repository.
<!-- https://mvnrepository.com/artifact/com.johnsnowlabs.nlp/spark-nlp -->
<dependency>
    <groupId>com.johnsnowlabs.nlp</groupId>
    <artifactId>spark-nlp_2.12</artifactId>
    <version>6.4.1</version>
</dependency>
spark-nlp-gpu:
<!-- https://mvnrepository.com/artifact/com.johnsnowlabs.nlp/spark-nlp-gpu -->
<dependency>
    <groupId>com.johnsnowlabs.nlp</groupId>
    <artifactId>spark-nlp-gpu_2.12</artifactId>
    <version>6.4.1</version>
</dependency>
spark-nlp-silicon:
<!-- https://mvnrepository.com/artifact/com.johnsnowlabs.nlp/spark-nlp-silicon -->
<dependency>
    <groupId>com.johnsnowlabs.nlp</groupId>
    <artifactId>spark-nlp-silicon_2.12</artifactId>
    <version>6.4.1</version>
</dependency>
spark-nlp-aarch64:
<!-- https://mvnrepository.com/artifact/com.johnsnowlabs.nlp/spark-nlp-aarch64 -->
<dependency>
    <groupId>com.johnsnowlabs.nlp</groupId>
    <artifactId>spark-nlp-aarch64_2.12</artifactId>
    <version>6.4.1</version>
</dependency>
SBT
spark-nlp on Apache Spark 3.0.x, 3.1.x, 3.2.x, 3.3.x, and 3.4.x
// https://mvnrepository.com/artifact/com.johnsnowlabs.nlp/spark-nlp
libraryDependencies += "com.johnsnowlabs.nlp" %% "spark-nlp" % "6.4.1"
spark-nlp-gpu:
// https://mvnrepository.com/artifact/com.johnsnowlabs.nlp/spark-nlp-gpu
libraryDependencies += "com.johnsnowlabs.nlp" %% "spark-nlp-gpu" % "6.4.1"
spark-nlp-silicon:
// https://mvnrepository.com/artifact/com.johnsnowlabs.nlp/spark-nlp-silicon
libraryDependencies += "com.johnsnowlabs.nlp" %% "spark-nlp-silicon" % "6.4.1"
spark-nlp-aarch64:
// https://mvnrepository.com/artifact/com.johnsnowlabs.nlp/spark-nlp-aarch64
libraryDependencies += "com.johnsnowlabs.nlp" %% "spark-nlp-aarch64" % "6.4.1"
Maven Central: https://mvnrepository.com/artifact/com.johnsnowlabs.nlp
If you are interested, there is a simple SBT project for Spark NLP to guide you on how to use it in your projects Spark NLP SBT Starter
Scala 2.13 Support
NOTE: PyPi installed Pyspark only runs on Scala 2.12, so the following section will not apply for it. If you need to start a Scala 2.13 instance, you can set the SPARK_HOME environment variable to a Spark Scala 2.13 installation, or install PySpark from the official Spark archives.
If you are using DependencyParserModel or TextMatcherModel in your pipelines and wish to import from the Scala 2.12 version to 2.13, then you will need to export them manually. For this, please see the example notebook Converting Spark NLP Scala 2.12 models to Scala 2.13.
spark-nlp with Scala 2.13 support has been published to Maven Central. You can use these coordinates to set up your Spark instance with config --packages or download the jar directly. For example:
# Load Spark NLP with Spark Submit
spark-submit --packages com.johnsnowlabs.nlp:spark-nlp_2.12:6.4.1
See our cheat sheet for more examples.
To use spark-nlp Scala 2.13 as a dependency, change the 2.12 string in our dependencies to 2.13.
spark-nlp:
<dependency>
    <groupId>com.johnsnowlabs.nlp</groupId>
    <artifactId>spark-nlp_2.13</artifactId>
    <version>6.4.1</version>
</dependency>
spark-nlp-gpu:
<dependency>
    <groupId>com.johnsnowlabs.nlp</groupId>
    <artifactId>spark-nlp-gpu_2.13</artifactId>
    <version>6.4.1</version>
</dependency>
spark-nlp-silicon:
<dependency>
    <groupId>com.johnsnowlabs.nlp</groupId>
    <artifactId>spark-nlp-silicon_2.13</artifactId>
    <version>6.4.1</version>
</dependency>
spark-nlp-aarch64:
<dependency>
    <groupId>com.johnsnowlabs.nlp</groupId>
    <artifactId>spark-nlp-aarch64_2.13</artifactId>
    <version>6.4.1</version>
</dependency>
If you are running an sbt project in Scala 2.13, then you you don’t require any changes, as the sbt syntax handles it automatically:
spark-nlp:
libraryDependencies += "com.johnsnowlabs.nlp" %% "spark-nlp" % "6.4.1"
spark-nlp-gpu:
libraryDependencies += "com.johnsnowlabs.nlp" %% "spark-nlp-gpu" % "6.4.1"
spark-nlp-silicon:
libraryDependencies += "com.johnsnowlabs.nlp" %% "spark-nlp-silicon" % "6.4.1"
spark-nlp-aarch64:
libraryDependencies += "com.johnsnowlabs.nlp" %% "spark-nlp-aarch64" % "6.4.1"
Command line
Spark NLP supports all major releases of Apache Spark 3.0.x, Apache Spark 3.1.x, Apache Spark 3.2.x, Apache Spark 3.3.x, Apache Spark 3.4.x, and Apache Spark 3.5.x This steps require internet connection.
Apache Spark 3.x (3.0.x, 3.1.x, 3.2.x, 3.3.x, 3.4.x, and 3.5.x - Scala 2.12)
# CPU

spark-shell --packages com.johnsnowlabs.nlp:spark-nlp_2.12:6.4.1

pyspark --packages com.johnsnowlabs.nlp:spark-nlp_2.12:6.4.1

spark-submit --packages com.johnsnowlabs.nlp:spark-nlp_2.12:6.4.1
The spark-nlp has been published to
the Maven Repository.
# GPU

spark-shell --packages com.johnsnowlabs.nlp:spark-nlp-gpu_2.12:6.4.1

pyspark --packages com.johnsnowlabs.nlp:spark-nlp-gpu_2.12:6.4.1

spark-submit --packages com.johnsnowlabs.nlp:spark-nlp-gpu_2.12:6.4.1
The spark-nlp-gpu has been published to
the Maven Repository.
# AArch64

spark-shell --packages com.johnsnowlabs.nlp:spark-nlp-aarch64_2.12:6.4.1

pyspark --packages com.johnsnowlabs.nlp:spark-nlp-aarch64_2.12:6.4.1

spark-submit --packages com.johnsnowlabs.nlp:spark-nlp-aarch64_2.12:6.4.1
The spark-nlp-aarch64 has been published to
the Maven Repository.
# Apple Silicon

spark-shell --packages com.johnsnowlabs.nlp:spark-nlp-silicon_2.12:6.4.1

pyspark --packages com.johnsnowlabs.nlp:spark-nlp-silicon_2.12:6.4.1

spark-submit --packages com.johnsnowlabs.nlp:spark-nlp-silicon_2.12:6.4.1
The spark-nlp-silicon has been published to
the Maven Repository.
NOTE: In case you are using large pretrained models like UniversalSentenceEncoder, you need to have the following set in your SparkSession:
spark-shell \
  --driver-memory 16g \
  --conf spark.kryoserializer.buffer.max=2000M \
  --packages com.johnsnowlabs.nlp:spark-nlp_2.12:6.4.1
Installation for Apple Silicon Macs
Starting from version 4.0.0, Spark NLP has experimental support for Apple Silicon Macs. Make sure the following prerequisites are met:
-
An Apple Silicon compatible Java version needs to be installed. We recommend Amazon Corretto Java 11, which can be easily installed with SDKMAN!.
To check if the installed Java environment is running natively on arm64, you can run the following command:
 johnsnow@m1mac ~ % realpath $(which java) | file -f -
 /Users/johnsnow/.sdkman/candidates/java/11.0.27-amzn/bin/java: Mach-O 64-bit executable arm64
Note the executable type
arm64. If it says anything else (e.g.universal binary,x86_64orarm64e) it might not work.The environment variable
JAVA_HOMEshould also be set to this java version. You can check this by runningecho $JAVA_HOMEin your terminal. If it is not set, you can set it by addingexport JAVA_HOME=$(/usr/libexec/java_home)to your~/.zshrcfile. -
If you are planning to use Annotators or Pipelines that use the RocksDB library (for example
WordEmbeddings,TextMatcherorexplain_document_dl_enPipeline respectively) withspark-submit, then a workaround is required to get it working. See Apple Silicon RocksDB workaround for spark-submit with Spark version >= 3.2.0.
Scala and Java Installation for Apple Silicon
Adding Spark NLP to your Scala or Java project is easy:
Simply change to dependency coordinates to spark-nlp-silicon and add the dependency to your
project.
How to do this is mentioned above: Scala And Java
So for example for Spark NLP with Apache Spark 3.0.x and 3.1.x you will end up with maven coordinates like these:
<!-- https://mvnrepository.com/artifact/com.johnsnowlabs.nlp/spark-nlp-silicon -->
<dependency>
    <groupId>com.johnsnowlabs.nlp</groupId>
    <artifactId>spark-nlp-silicon_2.12</artifactId>
    <version>6.4.1</version>
</dependency>
or in case of sbt:
// https://mvnrepository.com/artifact/com.johnsnowlabs.nlp/spark-nlp
libraryDependencies += "com.johnsnowlabs.nlp" %% "spark-nlp-silicon" % "6.4.1"
If everything went well, you can now start Spark NLP with the apple_silicon flag set to true:
import com.johnsnowlabs.nlp.SparkNLP

val spark = SparkNLP.start(apple_silicon = true)
Python for Apple Silicon
First, make sure you have a recent Python 3 installation.
johnsnow@m1mac ~ % python3 --version
Python 3.9.13
Then we can install the dependency as described in the Python section. It is also recommended to use a virtual environment for this.
If everything went well, you can now start Spark NLP with the apple_silicon flag set to True:
import sparknlp

spark = sparknlp.start(apple_silicon=True)
Apple Silicon RocksDB workaround for spark-submit with Spark version >= 3.2.0
Starting from Spark version 3.2.0, Spark includes their own version of the RocksDB dependency. Unfortunately, this is an older version of RocksDB does not include the necessary binaries for Apple Silicon. To work around this issue, the default packaged RocksDB jar has to be removed from the Spark distribution.
For example, if you downloaded Spark version 3.2.0 from the official archives, you will find the following folders in the directory of Spark:
$ ls
bin  conf  data  examples  jars  kubernetes  LICENSE  licenses
NOTICE  python  R  README.md  RELEASE  sbin  yarn
To check for the RocksDB jar, you can run
$ ls jars | grep rocksdb
rocksdbjni-6.20.3.jar
to find the jar you have to remove. After removing the jar, the pipelines should work as expected.
Installation for Linux Aarch64 Systems
Starting from version 4.1.0, Spark NLP supports Linux systems running on an aarch64 processor architecture. The necessary dependencies have been built on Ubuntu 16.04, so a recent system with an environment of at least that will be needed.
Check the Python section and the Scala And Java section on to install Spark NLP for your system.
Starting Spark NLP
Spark NLP needs to be started with the aarch64 flag set to true:
For Scala:
import com.johnsnowlabs.nlp.SparkNLP

val spark = SparkNLP.start(aarch64 = true)
For Python:
import sparknlp

spark = sparknlp.start(aarch64=True)
Google Colab Notebook
Google Colab is perhaps the easiest way to get started with spark-nlp. It requires no installation or setup other than having a Google account.
Run the following code in Google Colab notebook and start using spark-nlp right away.
# This is only to setup PySpark and Spark NLP on Colab
!wget http://setup.johnsnowlabs.com/colab.sh -O - | bash
This script comes with the two options to define pyspark and spark-nlp versions via options:
# -p is for pyspark
# -s is for spark-nlp
# by default they are set to the latest
!wget http://setup.johnsnowlabs.com/colab.sh -O - | bash /dev/stdin -p 3.4.0 -s 6.4.1
Spark NLP quick start on Google Colab is a live demo on Google Colab that performs named entity recognitions and sentiment analysis by using Spark NLP pretrained pipelines.
Kaggle Kernel
Run the following code in Kaggle Kernel and start using spark-nlp right away.
# Let's setup Kaggle for Spark NLP and PySpark
!wget http://setup.johnsnowlabs.com/kaggle.sh -O - | bash
Spark NLP quick start on Kaggle Kernel is a live demo on Kaggle Kernel that performs named entity recognitions by using Spark NLP pretrained pipeline.
Apache Zeppelin
Use either one of the following options
- Add the following Maven Coordinates to the interpreter’s library list
com.johnsnowlabs.nlp:spark-nlp_2.12:6.4.1
- Add a path to pre-built jar from here in the interpreter’s library list making sure the jar is available to driver path
Python in Zeppelin
Apart from the previous step, install the python module through pip
pip install spark-nlp==6.4.1
Or you can install spark-nlp from inside Zeppelin by using Conda:
python.conda install -c johnsnowlabs spark-nlp
Configure Zeppelin properly, use cells with %spark.pyspark or any interpreter name you chose.
Finally, in Zeppelin interpreter settings, make sure you set properly zeppelin.python to the python you want to use and
install the pip library with (e.g. python3).
An alternative option would be to set SPARK_SUBMIT_OPTIONS (zeppelin-env.sh) and make sure --packages is there as
shown earlier since it includes both scala and python side installation.
Jupyter Notebook
Recommended:
The easiest way to get this done on Linux and macOS is to simply install spark-nlp and pyspark PyPI packages and
launch the Jupyter from the same Python environment:
$ conda create -n sparknlp python=3.8 -y
$ conda activate sparknlp
# spark-nlp by default is based on pyspark 3.x
$ pip install spark-nlp==6.4.1 pyspark==3.3.1 jupyter
$ jupyter notebook
Then you can use python3 kernel to run your code with creating SparkSession via spark = sparknlp.start().
Optional:
If you are in different operating systems and require to make Jupyter Notebook run by using pyspark, you can follow these steps:
export SPARK_HOME=/path/to/your/spark/folder
export PYSPARK_PYTHON=python3
export PYSPARK_DRIVER_PYTHON=jupyter
export PYSPARK_DRIVER_PYTHON_OPTS=notebook

pyspark --packages com.johnsnowlabs.nlp:spark-nlp_2.12:6.4.1
Alternatively, you can mix in using --jars option for pyspark + pip install spark-nlp
If not using pyspark at all, you’ll have to run the instructions pointed here
Databricks Cluster
Install Spark NLP on Databricks
-
Create a cluster if you don’t have one already
-
On a new cluster or existing one you need to add the following to the
Advanced Options -> Sparktab:spark.kryoserializer.buffer.max 2000M spark.serializer org.apache.spark.serializer.KryoSerializer -
In
Librariestab inside your cluster you need to follow these steps:3.1. Install New -> PyPI ->
spark-nlp==6.4.1-> Install3.2. Install New -> Maven -> Coordinates ->
com.johnsnowlabs.nlp:spark-nlp_2.12:6.4.1-> Install -
Now you can attach your notebook to the cluster and use Spark NLP!
NOTE: Databricks’ runtimes support different Apache Spark major releases. Please make sure you choose the correct Spark NLP Maven package name (Maven Coordinate) for your runtime from our Packages Cheatsheet
ONNX GPU Inference on Databricks
To run infer ONNX models with GPU on Databricks clusters, we need to perform some additional setup steps. ONNX requires CUDA 12 and cuDNN 9 to be installed.
Therefore, we need to use Databricks runtimes starting from version 15, as these come with CUDA 12. However, they come with cuDNN 8, which we need to upgrade manually. To do so, we have to add the following script as an init script:
#!/bin/bash
sudo apt-get update && sudo apt-get -y install cudnn9-cuda-12
You need to save this script to a shell script file (i.e. upgrade-cudnn9.sh) in your workspace. Afterwards, you need to specify it on your compute resource under the Advanced options section. cuDNN will be upgraded to version 9 on all nodes before Spark is started.
Databricks Notebooks
You can view all the Databricks notebooks from this address:
https://johnsnowlabs.github.io/spark-nlp-workshop/databricks/index.html
Note: You can import these notebooks by using their URLs.
Microsoft Fabric
Microsoft Fabric notebooks run on managed Spark 3.4 clusters, so you need to provide the Spark NLP fat JARs through OneLake/ABFSS and wire them into the runtime via Spark properties.
Spark NLP on Microsoft Fabric
- Inside Fabric go to a workspace and click on
+New Itembutton, typelakeon the search bar and choseLakehouseand type a name for it.

- Inside Fabric go to a workspace and click on
+New Itembutton, typeenvon the search bar and choseEnvironmentand type a name for it.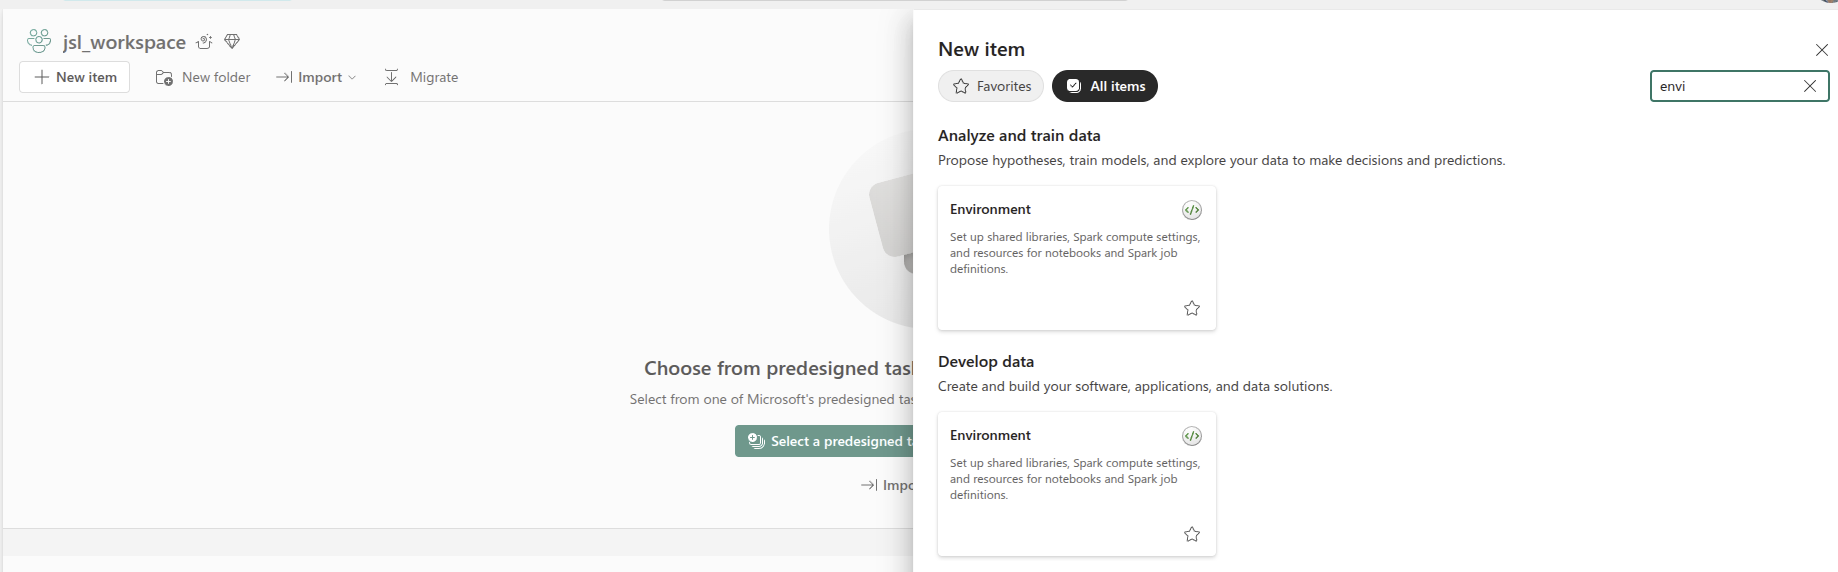
- Choose Fabric Runtime 1.2 (Spark 3.4 + Delta 2.4) then go to
Spark propertiesand setspark.jars - Upload
spark-nlp-assembly-6.4.1.jarto an ABFSS folder that both driver and executors can see, for exampleabfss://workspace@storage.dfs.core.windows.net/jars/.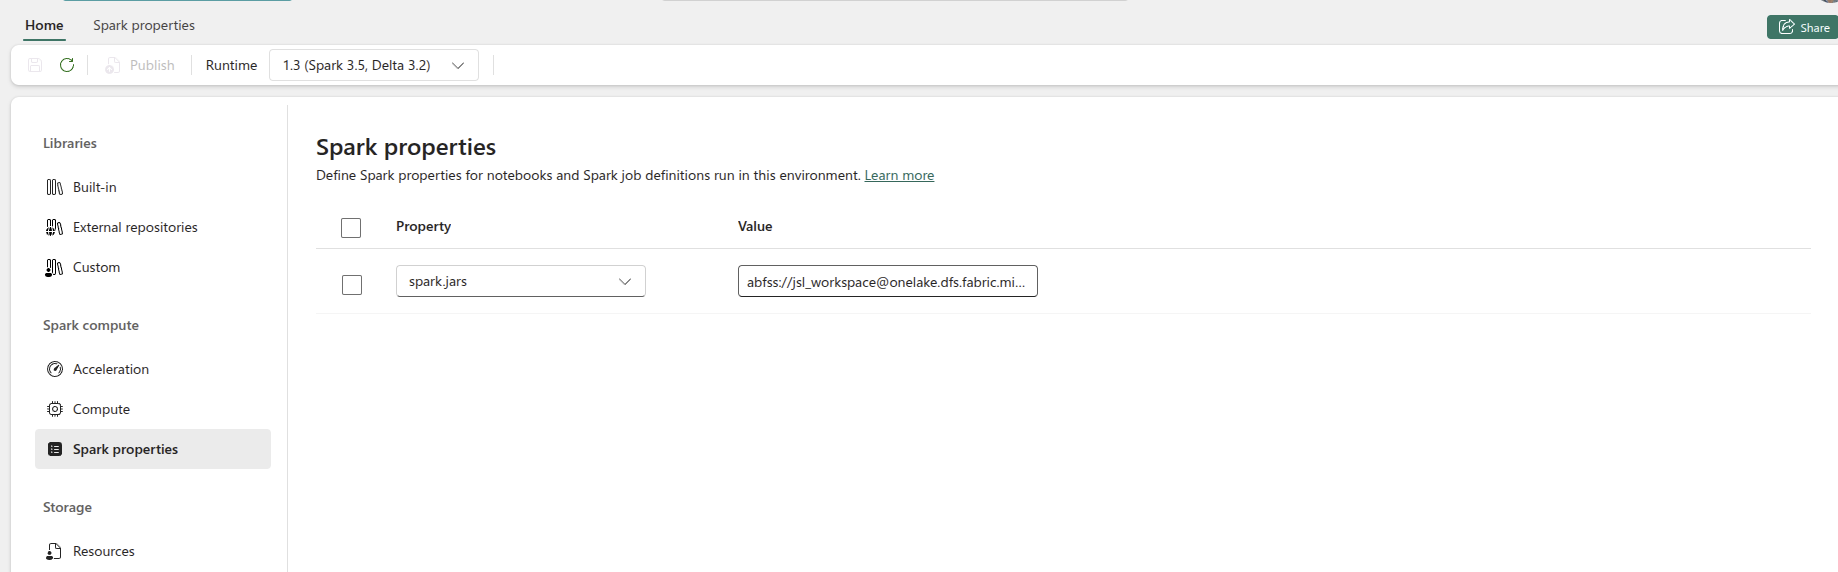
- Create a Notebook and attach it to the environment you created before.
Spark NLP ONNX compatibility on Microsoft Fabric
Follow the steps above to set up Spark NLP, then add the following additional steps to enable ONNX inference support:
- On
Spark propertiespointspark.executor.extraClassPathandspark.driver.extraClassPathto the ABFSS jar directory to ensure ONNX classes are visibleabfss://workspace@storage.dfs.core.windows.net/jars/spark-nlp-assembly-6.4.1.jar. - On
Spark propertiesenablespark.executor.userClassPathFirst=trueandspark.driver.userClassPathFirst=trueso the Spark NLP/ONNX classes take precedence over the Fabric runtime defaults.
These settings let Fabric distribute the Spark NLP binaries without manual copy steps and ensure ONNX inference components remain compatible with the managed runtime.
EMR Cluster
To launch EMR clusters with Apache Spark/PySpark and Spark NLP correctly you need to have bootstrap and software configuration.
A sample of your bootstrap script
#!/bin/bash
set -x -e

echo -e 'export PYSPARK_PYTHON=/usr/bin/python3
export HADOOP_CONF_DIR=/etc/hadoop/conf
export SPARK_JARS_DIR=/usr/lib/spark/jars
export SPARK_HOME=/usr/lib/spark' >> $HOME/.bashrc && source $HOME/.bashrc

sudo python3 -m pip install awscli boto spark-nlp

set +x
exit 0
A sample of your software configuration in JSON on S3 (must be public access):
[{
  "Classification": "spark-env",
  "Configurations": [{
    "Classification": "export",
    "Properties": {
      "PYSPARK_PYTHON": "/usr/bin/python3"
    }
  }]
},
{
  "Classification": "spark-defaults",
    "Properties": {
      "spark.yarn.stagingDir": "hdfs:///tmp",
      "spark.yarn.preserve.staging.files": "true",
      "spark.kryoserializer.buffer.max": "2000M",
      "spark.serializer": "org.apache.spark.serializer.KryoSerializer",
      "spark.driver.maxResultSize": "0",
      "spark.jars.packages": "com.johnsnowlabs.nlp:spark-nlp_2.12:6.4.1"
    }
}]
A sample of AWS CLI to launch EMR cluster:
aws emr create-cluster \
--name "Spark NLP 6.4.1" \
--release-label emr-6.2.0 \
--applications Name=Hadoop Name=Spark Name=Hive \
--instance-type m4.4xlarge \
--instance-count 3 \
--use-default-roles \
--log-uri "s3://<S3_BUCKET>/" \
--bootstrap-actions Path=s3://<S3_BUCKET>/emr-bootstrap.sh,Name=custome \
--configurations "https://<public_access>/sparknlp-config.json" \
--ec2-attributes KeyName=<your_ssh_key>,EmrManagedMasterSecurityGroup=<security_group_with_ssh>,EmrManagedSlaveSecurityGroup=<security_group_with_ssh> \
--profile <aws_profile_credentials>
EMR Serverless
This setup is for Spark NLP Open Source jobs on Amazon EMR Serverless. EMR Serverless does not run bootstrap actions like an EMR cluster, so the job should load its Python runtime, Spark NLP assembly JAR, and any offline model artifacts from S3.
The example below uses:
- EMR Serverless release
emr-7.12.0 - Python
3.11 - Spark NLP
6.4.1 - Scala
2.12
1. Prepare the S3 artifact layout
Create an S3 bucket or prefix that the EMR Serverless runtime role can read from and write logs/cache files to:
s3://<artifact-bucket>/spark-nlp-emr/
  scripts/
  envs/
  models/
  cache_pretrained/
  logs/
s3://<artifact-bucket>/jars/
Upload the Spark NLP assembly JAR to S3. You can use a JAR from the Spark NLP release notes or build one from source with sbt assembly.
aws s3 cp spark-nlp-assembly-6.4.1.jar \
  s3://<artifact-bucket>/jars/spark-nlp-assembly-6.4.1.jar
Use spark.jars with this S3 path for EMR Serverless jobs. If the runtime cannot reach Maven repositories, avoid spark.jars.packages.
2. Build the Python runtime archive
Build the Python environment on Amazon Linux 2023 so it matches the EMR Serverless runtime. The --copies option avoids Python binary symlinks that point back to the build machine.
FROM amazonlinux:2023

RUN dnf update -y && \
    dnf install -y \
      python3.11 \
      python3.11-pip \
      python3.11-devel \
      tar \
      gzip \
      findutils \
      shadow-utils && \
    dnf clean all

WORKDIR /work
CMD ["/bin/bash"]
Build and enter the container:
docker build -t emr-venv-builder -f Dockerfile .
docker run --rm -it \
  -u "$(id -u):$(id -g)" \
  -v "$PWD":/work \
  emr-venv-builder
Inside the container, create and pack the virtual environment:
cd /work
rm -rf spark-nlp-env spark-nlp-env.tar.gz

python3.11 -m venv --copies spark-nlp-env
source spark-nlp-env/bin/activate

python -m pip install --upgrade pip
pip install "spark-nlp==6.4.1" "numpy==1.26.4" venv-pack

python -c "import numpy; print('numpy ok')"
python -c "import sparknlp; print('sparknlp ok')"

venv-pack -o spark-nlp-env.tar.gz
Upload the archive:
aws s3 cp spark-nlp-env.tar.gz \
  s3://<artifact-bucket>/spark-nlp-emr/envs/spark-nlp-env.tar.gz
3. Choose how pretrained assets are loaded
There are two common patterns for pretrained resources on EMR Serverless.
The first pattern uses cache_pretrained with an S3 path. With this setup, calls such as PretrainedPipeline("recognize_entities_dl", lang="en") or .pretrained(...) download the compatible resource on the first run and store it in the configured S3 cache. Later runs reuse the cached copy.
--conf spark.jsl.settings.pretrained.cache_folder=s3a://<artifact-bucket>/spark-nlp-emr/cache_pretrained/
Use this pattern when the EMR Serverless job can reach the Spark NLP public model repository and the cache bucket is writable by the runtime role or by the temporary credentials passed to Spark.
Then use the standard pretrained APIs:
from pyspark.sql import SparkSession
from sparknlp.pretrained import PretrainedPipeline

spark = SparkSession.builder.appName("Spark NLP EMR Serverless").getOrCreate()
pipeline = PretrainedPipeline("recognize_entities_dl", lang="en")
The second pattern loads a model or pipeline that was already downloaded and saved to S3. This does not populate cache_pretrained; it reads the exact saved path you provide. Use this when the resource is prepared ahead of time or when the job should not download from the public model repository at runtime.
from pyspark.sql import SparkSession
from sparknlp.pretrained import PretrainedPipeline

spark = SparkSession.builder.appName("Spark NLP EMR Serverless").getOrCreate()
pipeline = PretrainedPipeline.from_disk(
    "s3a://<artifact-bucket>/spark-nlp-emr/models/recognize_entities_dl"
)
To prepare a pipeline in an environment with internet access and upload it to S3:
import sparknlp
from sparknlp.pretrained import PretrainedPipeline

spark = sparknlp.start()
pipeline = PretrainedPipeline("recognize_entities_dl", lang="en")
pipeline.model.write().overwrite().save("recognize_entities_dl")
spark.stop()
aws s3 cp --recursive recognize_entities_dl \
  s3://<artifact-bucket>/spark-nlp-emr/models/recognize_entities_dl
The saved path should contain metadata/ and stages/ at the top level.
If you prefer a fully offline local load, archive the folder, pass the archive in spark.archives, and load it with PretrainedPipeline.from_disk("./recognize_entities_dl"). AWS documents spark.archives as a comma-separated list of .jar, .tar.gz, .tgz, and .zip files extracted into each executor working directory, but it does not publish a model-archive-specific size quota. In Spark NLP EMR Serverless experiments, model archives larger than approximately 1 GB failed during archive distribution or extraction. Treat spark.archives as a small-model convenience path; for larger models, prefer direct S3 loading with PretrainedPipeline.from_disk("s3a://...") or the S3 cache_pretrained configuration.
4. Create the job script
Save the following as ner_test.py:
from pyspark.sql import SparkSession
from sparknlp.pretrained import PretrainedPipeline


def main():
    spark = SparkSession.builder.appName("Spark NLP EMR Serverless").getOrCreate()

    text = "Barack Obama was born in Hawaii and was elected president of the United States."

    # Use this when spark.jsl.settings.pretrained.cache_folder points to S3.
    pipeline = PretrainedPipeline("recognize_entities_dl", lang="en")

    # To load a pipeline already saved in S3, use:
    # pipeline = PretrainedPipeline.from_disk(
    #     "s3a://<artifact-bucket>/spark-nlp-emr/models/recognize_entities_dl"
    # )
    #
    # For a fully offline local load, archive the pipeline in spark.archives and use:
    # pipeline = PretrainedPipeline.from_disk("./recognize_entities_dl")

    result = pipeline.fullAnnotate(text)[0]

    print("=== INPUT ===")
    print(text)

    print("\n=== NER OUTPUT ===")
    for entity in result.get("entities", []):
        print(
            f"text={entity.result!r}, "
            f"label={entity.metadata.get('entity')!r}, "
            f"begin={entity.begin}, end={entity.end}"
        )

    spark.stop()


if __name__ == "__main__":
    main()
Upload the script:
aws s3 cp ner_test.py \
  s3://<artifact-bucket>/spark-nlp-emr/scripts/ner_test.py
5. Create the EMR Serverless application
Create an EMR Serverless Spark application with a release label compatible with your Spark NLP build, for example emr-7.12.0. Keep the returned application id and use an execution role that can access the S3 paths above.
aws emr-serverless create-application \
  --name spark-nlp-os \
  --type SPARK \
  --release-label emr-7.12.0
6. Submit the job
Submit with the Python environment archive, the Spark NLP assembly JAR, and the S3 pretrained cache.
The following Open Source example uses temporary AWS credentials. Replace every placeholder before running it. If the EMR Serverless runtime role already has read/write permissions for the artifact bucket and cache path, omit the temporary credential lines, including spark.hadoop.fs.s3a.aws.credentials.provider, spark.hadoop.fs.s3a.access.key, spark.hadoop.fs.s3a.secret.key, spark.hadoop.fs.s3a.session.token, and spark.jsl.settings.aws.credentials.*, and let S3A use the runtime role.
--conf spark.archives=s3://<artifact-bucket>/spark-nlp-emr/envs/spark-nlp-env.tar.gz#environment \
--conf spark.emr-serverless.driverEnv.PYSPARK_DRIVER_PYTHON=./environment/bin/python \
--conf spark.emr-serverless.driverEnv.PYSPARK_PYTHON=./environment/bin/python \
--conf spark.executorEnv.PYSPARK_PYTHON=./environment/bin/python \
--conf spark.jars=s3://<artifact-bucket>/jars/spark-nlp-assembly-6.4.1.jar \
--conf spark.jsl.settings.pretrained.cache_folder=s3a://<artifact-bucket>/spark-nlp-emr/cache_pretrained/ \
--conf spark.hadoop.fs.s3a.impl=org.apache.hadoop.fs.s3a.S3AFileSystem \
--conf spark.hadoop.fs.s3a.endpoint=s3.<aws-region>.amazonaws.com \
--conf spark.hadoop.fs.s3a.aws.credentials.provider=org.apache.hadoop.fs.s3a.TemporaryAWSCredentialsProvider \
--conf spark.hadoop.fs.s3a.access.key=<aws-access-key-id> \
--conf spark.hadoop.fs.s3a.secret.key=<aws-secret-access-key> \
--conf spark.hadoop.fs.s3a.session.token=<aws-session-token> \
--conf spark.jsl.settings.aws.region=<aws-region> \
--conf spark.jsl.settings.aws.credentials.access_key_id=<aws-access-key-id> \
--conf spark.jsl.settings.aws.credentials.secret_access_key=<aws-secret-access-key> \
--conf spark.jsl.settings.aws.credentials.session_token=<aws-session-token> \
--conf spark.hadoop.hive.metastore.client.factory.class=com.amazonaws.glue.catalog.metastore.AWSGlueDataCatalogHiveClientFactory
For direct S3 loading of a previously downloaded Open Source pipeline, keep the Python, JAR, and S3A properties, remove spark.jsl.settings.pretrained.cache_folder unless the same job also downloads other pretrained resources, and load the saved pipeline path with PretrainedPipeline.from_disk("s3a://<artifact-bucket>/spark-nlp-emr/models/<pipeline-name>").
--conf spark.archives=s3://<artifact-bucket>/spark-nlp-emr/envs/spark-nlp-env.tar.gz#environment \
--conf spark.emr-serverless.driverEnv.PYSPARK_DRIVER_PYTHON=./environment/bin/python \
--conf spark.emr-serverless.driverEnv.PYSPARK_PYTHON=./environment/bin/python \
--conf spark.executorEnv.PYSPARK_PYTHON=./environment/bin/python \
--conf spark.jars=s3://<artifact-bucket>/jars/spark-nlp-assembly-6.4.1.jar \
--conf spark.hadoop.fs.s3a.impl=org.apache.hadoop.fs.s3a.S3AFileSystem \
--conf spark.hadoop.fs.s3a.endpoint=s3.<aws-region>.amazonaws.com \
--conf spark.hadoop.fs.s3a.aws.credentials.provider=org.apache.hadoop.fs.s3a.TemporaryAWSCredentialsProvider \
--conf spark.hadoop.fs.s3a.access.key=<aws-access-key-id> \
--conf spark.hadoop.fs.s3a.secret.key=<aws-secret-access-key> \
--conf spark.hadoop.fs.s3a.session.token=<aws-session-token> \
--conf spark.hadoop.hive.metastore.client.factory.class=com.amazonaws.glue.catalog.metastore.AWSGlueDataCatalogHiveClientFactory
Pass the selected properties as the sparkSubmitParameters string:
aws emr-serverless start-job-run \
  --application-id <application-id> \
  --execution-role-arn <emr-serverless-runtime-role-arn> \
  --job-driver '{
    "sparkSubmit": {
      "entryPoint": "s3://<artifact-bucket>/spark-nlp-emr/scripts/ner_test.py",
      "sparkSubmitParameters": "<spark-submit-parameters>"
    }
  }' \
  --configuration-overrides '{
    "monitoringConfiguration": {
      "s3MonitoringConfiguration": {
        "logUri": "s3://<artifact-bucket>/spark-nlp-emr/logs/"
      }
    }
  }'
For a fully offline local load, add the model archive to spark.archives and load it with PretrainedPipeline.from_disk("./recognize_entities_dl") in the script. Use this only for small model archives. AWS documents spark.archives extraction support, while EMR Serverless worker disk defaults start at 20 GB and can be configured up to 200 GB per worker, but this is not the same as an AWS-supported archive size guarantee. Based on Spark NLP EMR Serverless testing, use direct S3 loading or cache_pretrained for model archives near or above 1 GB.
--conf spark.archives=s3://<artifact-bucket>/spark-nlp-emr/envs/spark-nlp-env.tar.gz#environment,s3://<artifact-bucket>/spark-nlp-emr/models/recognize_entities_dl.tar.gz#recognize_entities_dl
The required Spark properties are:
| Property | Purpose |
|---|---|
spark.archives |
Extracts the Python environment as ./environment and, for small fully offline model archives, the pipeline as ./recognize_entities_dl. Prefer direct S3 loading or cache_pretrained for larger models. |
spark.emr-serverless.driverEnv.PYSPARK_DRIVER_PYTHON |
Forces the driver to use the packed Python interpreter. |
spark.emr-serverless.driverEnv.PYSPARK_PYTHON |
Sets the driver-side PySpark Python interpreter. |
spark.executorEnv.PYSPARK_PYTHON |
Sets the executor-side PySpark Python interpreter. |
spark.jars |
Loads the Spark NLP assembly JAR from S3 without resolving Maven packages at job startup. |
spark.jsl.settings.pretrained.cache_folder |
Stores pretrained models and pipelines in an S3 cache when using PretrainedPipeline(...) or .pretrained(...). |
spark.hadoop.fs.s3a.impl |
Enables Hadoop S3A paths such as s3a://... for loading models, pipelines, and cache contents. |
spark.hadoop.fs.s3a.endpoint |
Points S3A to the AWS regional endpoint used by the bucket. |
spark.hadoop.fs.s3a.aws.credentials.provider |
Selects the S3A credential provider. Use TemporaryAWSCredentialsProvider when passing access key, secret key, and session token. |
spark.hadoop.fs.s3a.access.key |
Temporary AWS access key for Hadoop S3A access. Omit when using the EMR Serverless runtime role. |
spark.hadoop.fs.s3a.secret.key |
Temporary AWS secret key for Hadoop S3A access. Omit when using the EMR Serverless runtime role. |
spark.hadoop.fs.s3a.session.token |
Temporary AWS session token for Hadoop S3A access. Omit when using the EMR Serverless runtime role. |
spark.jsl.settings.aws.region |
AWS region used by Spark NLP cloud cache operations. |
spark.jsl.settings.aws.credentials.access_key_id |
Temporary AWS access key used by Spark NLP cloud cache operations. Omit when using the EMR Serverless runtime role. |
spark.jsl.settings.aws.credentials.secret_access_key |
Temporary AWS secret key used by Spark NLP cloud cache operations. Omit when using the EMR Serverless runtime role. |
spark.jsl.settings.aws.credentials.session_token |
Temporary AWS session token used by Spark NLP cloud cache operations. Omit when using the EMR Serverless runtime role. |
spark.hadoop.hive.metastore.client.factory.class |
Optional AWS Glue Data Catalog integration when the job also needs Glue-backed Hive metadata. |
GCP Dataproc
- Create a cluster if you don’t have one already as follows.
At gcloud shell:
gcloud services enable dataproc.googleapis.com \
  compute.googleapis.com \
  storage-component.googleapis.com \
  bigquery.googleapis.com \
  bigquerystorage.googleapis.com
REGION=<region>
BUCKET_NAME=<bucket_name>
gsutil mb -c standard -l ${REGION} gs://${BUCKET_NAME}
REGION=<region>
ZONE=<zone>
CLUSTER_NAME=<cluster_name>
BUCKET_NAME=<bucket_name>
You can set image-version, master-machine-type, worker-machine-type, master-boot-disk-size, worker-boot-disk-size, num-workers as your needs. If you use the previous image-version from 2.0, you should also add ANACONDA to optional-components. And, you should enable gateway. Don’t forget to set the maven coordinates for the jar in properties.
gcloud dataproc clusters create ${CLUSTER_NAME} \
  --region=${REGION} \
  --zone=${ZONE} \
  --image-version=2.0 \
  --master-machine-type=n1-standard-4 \
  --worker-machine-type=n1-standard-2 \
  --master-boot-disk-size=128GB \
  --worker-boot-disk-size=128GB \
  --num-workers=2 \
  --bucket=${BUCKET_NAME} \
  --optional-components=JUPYTER \
  --enable-component-gateway \
  --metadata 'PIP_PACKAGES=spark-nlp spark-nlp-display google-cloud-bigquery google-cloud-storage' \
  --initialization-actions gs://goog-dataproc-initialization-actions-${REGION}/python/pip-install.sh \
  --properties spark:spark.serializer=org.apache.spark.serializer.KryoSerializer,spark:spark.driver.maxResultSize=0,spark:spark.kryoserializer.buffer.max=2000M,spark:spark.jars.packages=com.johnsnowlabs.nlp:spark-nlp_2.12:6.4.1
-
On an existing one, you need to install spark-nlp and spark-nlp-display packages from PyPI.
-
Now, you can attach your notebook to the cluster and use the Spark NLP!
Apache Spark Support
Spark NLP 6.4.1 has been built on top of Apache Spark 3.4 while fully supports Apache Spark 3.0.x, 3.1.x, 3.2.x, 3.3.x, 3.4.x, and 3.5.x
| Spark NLP | Apache Spark 3.5.x | Apache Spark 3.4.x | Apache Spark 3.3.x | Apache Spark 3.2.x | Apache Spark 3.1.x | Apache Spark 3.0.x | Apache Spark 2.4.x | Apache Spark 2.3.x |
|---|---|---|---|---|---|---|---|---|
| 5.4.x | YES | YES | YES | YES | YES | YES | NO | NO |
| 5.3.x | YES | YES | YES | YES | YES | YES | NO | NO |
| 5.2.x | YES | YES | YES | YES | YES | YES | NO | NO |
| 5.1.x | Partially | YES | YES | YES | YES | YES | NO | NO |
| 5.0.x | YES | YES | YES | YES | YES | YES | NO | NO |
| 4.4.x | YES | YES | YES | YES | YES | YES | NO | NO |
| 4.3.x | NO | NO | YES | YES | YES | YES | NO | NO |
| 4.2.x | NO | NO | YES | YES | YES | YES | NO | NO |
| 4.1.x | NO | NO | YES | YES | YES | YES | NO | NO |
| 4.0.x | NO | NO | YES | YES | YES | YES | NO | NO |
Find out more about Spark NLP versions from our release notes.
Scala and Python Support
| Spark NLP | Python 3.6 | Python 3.7 | Python 3.8 | Python 3.9 | Python 3.10 | Scala 2.11 | Scala 2.12 |
|---|---|---|---|---|---|---|---|
| 5.3.x | NO | YES | YES | YES | YES | NO | YES |
| 5.2.x | NO | YES | YES | YES | YES | NO | YES |
| 5.1.x | NO | YES | YES | YES | YES | NO | YES |
| 5.0.x | NO | YES | YES | YES | YES | NO | YES |
| 4.4.x | NO | YES | YES | YES | YES | NO | YES |
| 4.3.x | YES | YES | YES | YES | YES | NO | YES |
| 4.2.x | YES | YES | YES | YES | YES | NO | YES |
| 4.1.x | YES | YES | YES | YES | NO | NO | YES |
| 4.0.x | YES | YES | YES | YES | NO | NO | YES |
Databricks Support
Spark NLP 6.4.1 has been tested and is compatible with the following runtimes:
| CPU | GPU |
|---|---|
| 9.1 / 9.1 ML | 9.1 ML & GPU |
| 10.1 / 10.1 ML | 10.1 ML & GPU |
| 10.2 / 10.2 ML | 10.2 ML & GPU |
| 10.3 / 10.3 ML | 10.3 ML & GPU |
| 10.4 / 10.4 ML | 10.4 ML & GPU |
| 10.5 / 10.5 ML | 10.5 ML & GPU |
| 11.0 / 11.0 ML | 11.0 ML & GPU |
| 11.1 / 11.1 ML | 11.1 ML & GPU |
| 11.2 / 11.2 ML | 11.2 ML & GPU |
| 11.3 / 11.3 ML | 11.3 ML & GPU |
| 12.0 / 12.0 ML | 12.0 ML & GPU |
| 12.1 / 12.1 ML | 12.1 ML & GPU |
| 12.2 / 12.2 ML | 12.2 ML & GPU |
| 13.0 / 13.0 ML | 13.0 ML & GPU |
| 13.1 / 13.1 ML | 13.1 ML & GPU |
| 13.2 / 13.2 ML | 13.2 ML & GPU |
| 13.3 / 13.3 ML | 13.3 ML & GPU |
| 14.0 / 14.0 ML | 14.0 ML & GPU |
| 14.1 / 14.1 ML | 14.1 ML & GPU |
| 15.x / 15.x ML | 15.x ML & GPU |
| 16.4 / 16.4 ML | 16.4 ML & GPU |
EMR Support
Spark NLP 6.4.1 has been tested and is compatible with the following EMR releases:
- emr-6.2.0
- emr-6.3.0
- emr-6.3.1
- emr-6.4.1
- emr-6.5.0
- emr-6.6.0
- emr-6.7.0
- emr-6.8.0
- emr-6.9.0
- emr-6.10.0
- emr-6.11.0
- emr-6.12.0
- emr-6.13.0
- emr-6.14.0
Full list of Amazon EMR 6.x releases
NOTE: The EMR 6.1.0 and 6.1.1 are not supported.
How to create EMR cluster via CLI
To lanuch EMR cluster with Apache Spark/PySpark and Spark NLP correctly you need to have bootstrap and software configuration.
A sample of your bootstrap script
#!/bin/bash
set -x -e

echo -e 'export PYSPARK_PYTHON=/usr/bin/python3
export HADOOP_CONF_DIR=/etc/hadoop/conf
export SPARK_JARS_DIR=/usr/lib/spark/jars
export SPARK_HOME=/usr/lib/spark' >> $HOME/.bashrc && source $HOME/.bashrc

sudo python3 -m pip install awscli boto spark-nlp

set +x
exit 0
A sample of your software configuration in JSON on S3 (must be public access):
[{
  "Classification": "spark-env",
  "Configurations": [{
    "Classification": "export",
    "Properties": {
      "PYSPARK_PYTHON": "/usr/bin/python3"
    }
  }]
},
{
  "Classification": "spark-defaults",
    "Properties": {
      "spark.yarn.stagingDir": "hdfs:///tmp",
      "spark.yarn.preserve.staging.files": "true",
      "spark.kryoserializer.buffer.max": "2000M",
      "spark.serializer": "org.apache.spark.serializer.KryoSerializer",
      "spark.driver.maxResultSize": "0",
      "spark.jars.packages": "com.johnsnowlabs.nlp:spark-nlp_2.12:6.4.1"
    }
}
]
A sample of AWS CLI to launch EMR cluster:
aws emr create-cluster \
--name "Spark NLP 6.4.1" \
--release-label emr-6.2.0 \
--applications Name=Hadoop Name=Spark Name=Hive \
--instance-type m4.4xlarge \
--instance-count 3 \
--use-default-roles \
--log-uri "s3://<S3_BUCKET>/" \
--bootstrap-actions Path=s3://<S3_BUCKET>/emr-bootstrap.sh,Name=custome \
--configurations "https://<public_access>/sparknlp-config.json" \
--ec2-attributes KeyName=<your_ssh_key>,EmrManagedMasterSecurityGroup=<security_group_with_ssh>,EmrManagedSlaveSecurityGroup=<security_group_with_ssh> \
--profile <aws_profile_credentials>
GCP Dataproc Support
- Create a cluster if you don’t have one already as follows.
At gcloud shell:
gcloud services enable dataproc.googleapis.com \
  compute.googleapis.com \
  storage-component.googleapis.com \
  bigquery.googleapis.com \
  bigquerystorage.googleapis.com
REGION=<region>
BUCKET_NAME=<bucket_name>
gsutil mb -c standard -l ${REGION} gs://${BUCKET_NAME}
REGION=<region>
ZONE=<zone>
CLUSTER_NAME=<cluster_name>
BUCKET_NAME=<bucket_name>
You can set image-version, master-machine-type, worker-machine-type, master-boot-disk-size, worker-boot-disk-size, num-workers as your needs. If you use the previous image-version from 2.0, you should also add ANACONDA to optional-components. And, you should enable gateway.
gcloud dataproc clusters create ${CLUSTER_NAME} \
  --region=${REGION} \
  --zone=${ZONE} \
  --image-version=2.0 \
  --master-machine-type=n1-standard-4 \
  --worker-machine-type=n1-standard-2 \
  --master-boot-disk-size=128GB \
  --worker-boot-disk-size=128GB \
  --num-workers=2 \
  --bucket=${BUCKET_NAME} \
  --optional-components=JUPYTER \
  --enable-component-gateway \
  --metadata 'PIP_PACKAGES=spark-nlp spark-nlp-display google-cloud-bigquery google-cloud-storage' \
  --initialization-actions gs://goog-dataproc-initialization-actions-${REGION}/python/pip-install.sh
-
On an existing one, you need to install spark-nlp and spark-nlp-display packages from PyPI.
-
Now, you can attach your notebook to the cluster and use the Spark NLP!
Amazon Linux 2 Support
# Update Package List & Install  Required Packages
sudo yum update
sudo yum install -y amazon-linux-extras
sudo yum -y install python3-pip

# Create Python virtual environment and activate it:
python3 -m venv .sparknlp-env
source .sparknlp-env/bin/activate
Check JAVA version:
- For Sparknlp versions above 3.x, please use JAVA-11
Checking Java versions installed on your machine:
sudo alternatives --config java
You can pick the index number (I am using java-8 as default - index 2):

If you dont have java-11 or java-8 in you system, you can easily install via:
sudo yum install java-1.8.0-openjdk
Now, we can start installing the required libraries:
pip install pyspark==3.3.1
pip install spark-nlp
Docker Support
For having Spark NLP, PySpark, Jupyter, and other ML/DL dependencies as a Docker image you can use the following template:
#Download base image ubuntu 18.04
FROM ubuntu:18.04

ENV NB_USER jovyan
ENV NB_UID 1000
ENV HOME /home/${NB_USER}

ENV PYSPARK_PYTHON=python3
ENV PYSPARK_DRIVER_PYTHON=python3

RUN apt-get update && apt-get install -y \
    tar \
    wget \
    bash \
    rsync \
    gcc \
    libfreetype6-dev \
    libhdf5-serial-dev \
    libpng-dev \
    libzmq3-dev \
    python3 \
    python3-dev \
    python3-pip \
    unzip \
    pkg-config \
    software-properties-common \
    graphviz

RUN adduser --disabled-password \
    --gecos "Default user" \
    --uid ${NB_UID} \
    ${NB_USER}

# Install OpenJDK-8
RUN apt-get update && \
    apt-get install -y openjdk-8-jdk && \
    apt-get install -y ant && \
    apt-get clean;

# Fix certificate issues
RUN apt-get update && \
    apt-get install ca-certificates-java && \
    apt-get clean && \
    update-ca-certificates -f;
# Setup JAVA_HOME -- useful for docker commandline
ENV JAVA_HOME /usr/lib/jvm/java-8-openjdk-amd64/
RUN export JAVA_HOME

RUN echo "export JAVA_HOME=/usr/lib/jvm/java-8-openjdk-amd64/" >> ~/.bashrc

RUN apt-get clean && rm -rf /var/lib/apt/lists/* /tmp/* /var/tmp/*

RUN pip3 install --upgrade pip
# You only need pyspark and spark-nlp paclages to use Spark NLP
# The rest of the PyPI packages are here as examples
RUN pip3 install --no-cache-dir pyspark spark-nlp==3.2.3 notebook==5.* numpy pandas mlflow Keras scikit-spark scikit-learn scipy matplotlib pydot tensorflow==2.4.1 graphviz

# Make sure the contents of our repo are in ${HOME}
RUN mkdir -p /home/jovyan/tutorials
RUN mkdir -p /home/jovyan/jupyter

COPY data ${HOME}/data
COPY jupyter ${HOME}/jupyter
COPY tutorials ${HOME}/tutorials
RUN jupyter notebook --generate-config
COPY jupyter_notebook_config.json /home/jovyan/.jupyter/jupyter_notebook_config.json
USER root
RUN chown -R ${NB_UID} ${HOME}
USER ${NB_USER}

WORKDIR ${HOME}

# Specify the default command to run
CMD ["jupyter", "notebook", "--ip", "0.0.0.0"]
Finally, use jupyter_notebook_config.json for the password:
{
  "NotebookApp": {
    "password": "<sha1-password-hash-generated-by-jupyter>"
  }
}
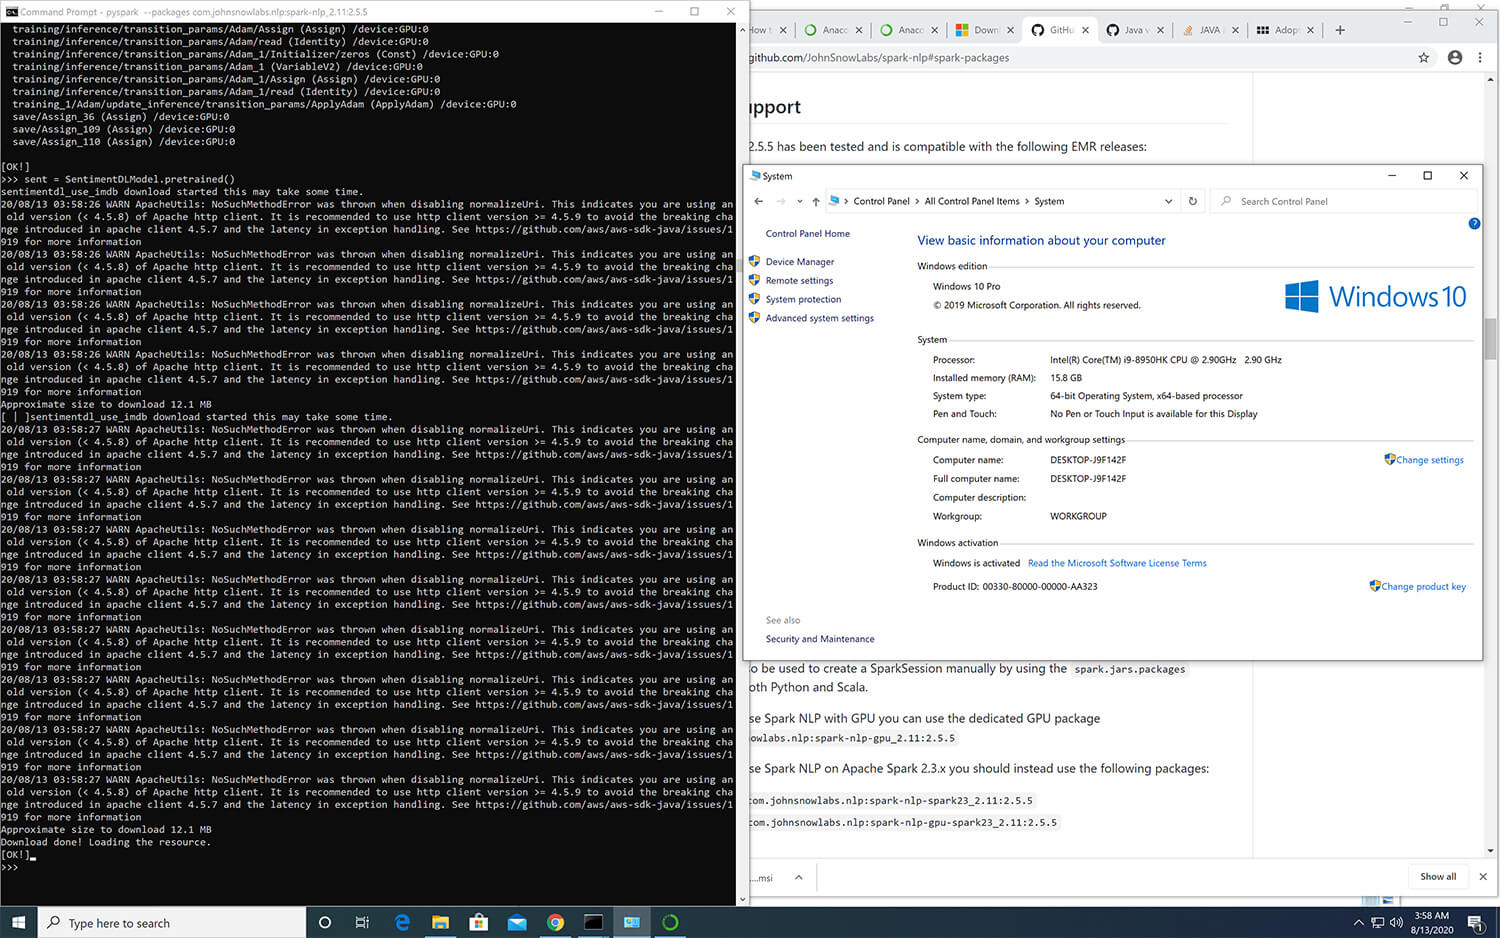
Windows Support
In order to fully take advantage of Spark NLP on Windows (8 or 10), you need to setup/install Apache Spark, Apache Hadoop, Java and a Pyton environment correctly by following the following instructions: https://github.com/JohnSnowLabs/spark-nlp/discussions/1022
How to correctly install Spark NLP on Windows
Follow the below steps to set up Spark NLP with Spark 3.2.3:
- Download Adopt OpenJDK 1.8
- Make sure it is 64-bit
- Make sure you install it in the root of your main drive
C:\java. - During installation after changing the path, select setting Path
- Download the pre-compiled Hadoop binaries
winutils.exe,hadoop.dlland put it in a folder calledC:\hadoop\binfrom https://github.com/cdarlint/winutils/tree/master/hadoop-3.2.0/bin- Note: The version above is for Spark 3.2.3, which was built for Hadoop 3.2.0. You might have to change the hadoop version in the link, depending on which Spark version you are using.
-
Download Apache Spark 3.2.3 and extract it to
C:\spark. -
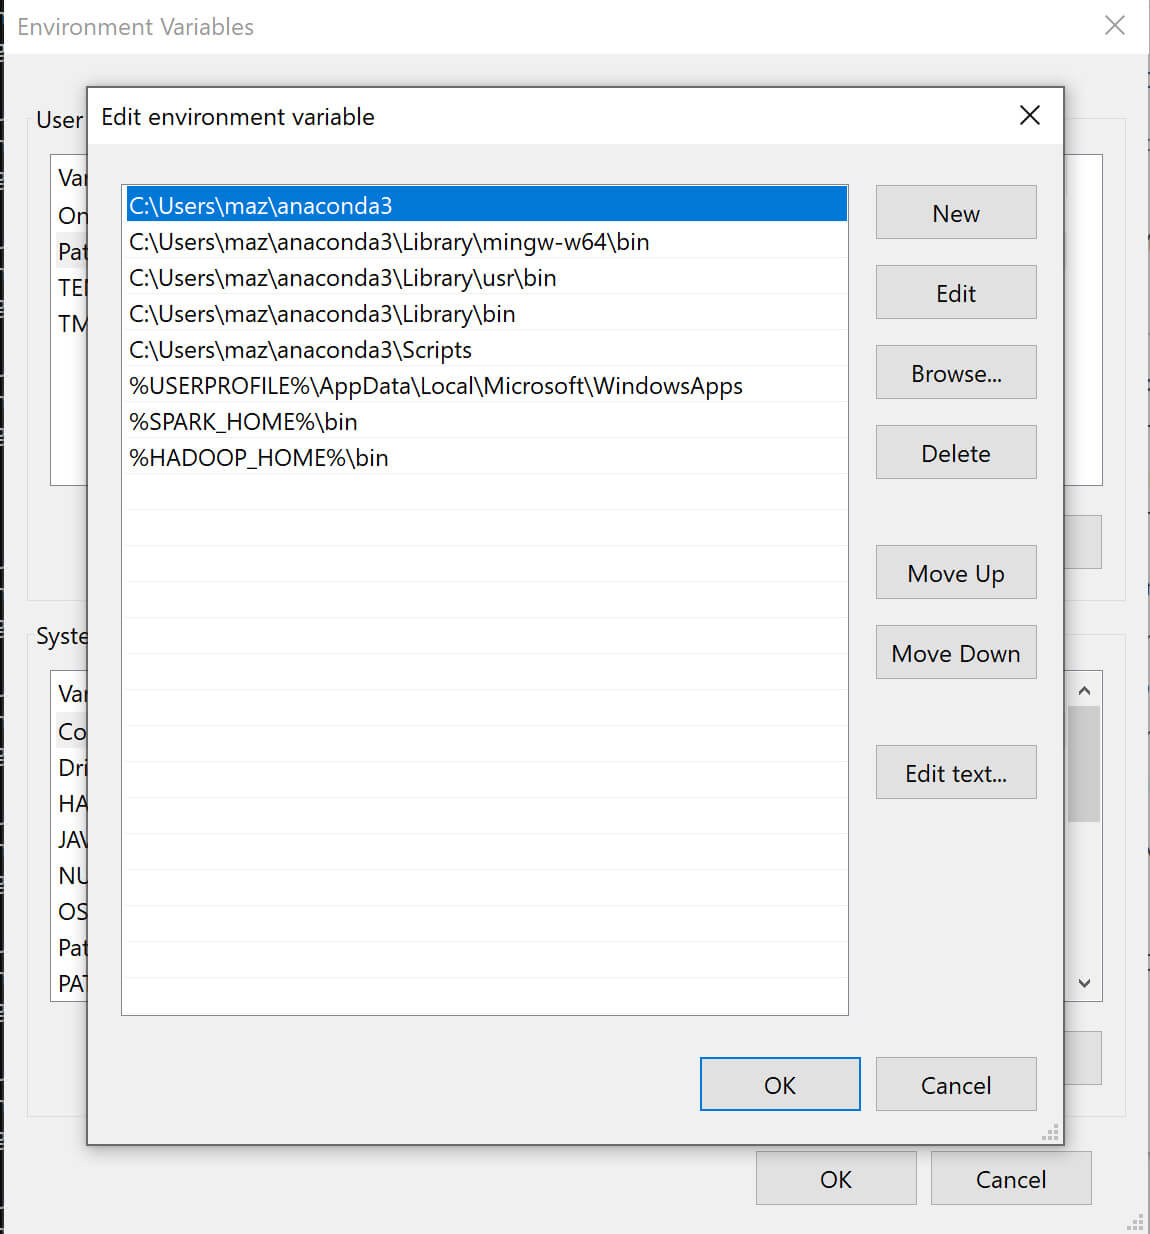
Set/add environment variables for
HADOOP_HOMEtoC:\hadoopandSPARK_HOMEtoC:\spark. -
Add
%HADOOP_HOME%\binand%SPARK_HOME%\binto thePATHenvironment variable. -
Install Microsoft Visual C++ 2010 Redistributed Package (x64).
- Create folders
C:\tmpandC:\tmp\hive-
If you encounter issues with permissions to these folders, you might need to change the permissions by running the following commands:
%HADOOP_HOME%\bin\winutils.exe chmod 777 /tmp/hive
%HADOOP_HOME%\bin\winutils.exe chmod 777 /tmp/
-
Requisites for PySpark
We recommend using conda to manage your Python environment on Windows.
- Download Miniconda for Python 3.8
- See Quick Install on how to set up a conda environment with Spark NLP.
- The following environment variables need to be set:
PYSPARK_PYTHON=python- Optionally, if you want to use the Jupyter Notebook runtime of Spark:
- first install it in the environment with
conda install notebook - then set
PYSPARK_DRIVER_PYTHON=jupyter,PYSPARK_DRIVER_PYTHON_OPTS=notebook
- first install it in the environment with
- The environment variables can either be directly set in windows, or if only
the conda env will be used, with
conda env config vars set PYSPARK_PYTHON=python. After setting the variable with conda, you need to deactivate and re-activate the environment.
Now you can use the downloaded binary by navigating to %SPARK_HOME%\bin and
running
Either create a conda env for python 3.6, install pyspark==3.3.1 spark-nlp numpy and use Jupyter/python console, or in the same conda env you can go to spark bin for pyspark –packages com.johnsnowlabs.nlp:spark-nlp_2.12:6.4.1.

Offline
Spark NLP library and all the pre-trained models/pipelines can be used entirely offline with no access to the Internet. If you are behind a proxy or a firewall with no access to the Maven repository (to download packages) or/and no access to S3 (to automatically download models and pipelines), you can simply follow the instructions to have Spark NLP without any limitations offline:
- Instead of using the Maven package, you need to load our Fat JAR
- Instead of using PretrainedPipeline for pretrained pipelines or the
.pretrained()function to download pretrained models, you will need to manually download your pipeline/model from Models Hub, extract it, and load it.
Example of SparkSession with Fat JAR to have Spark NLP offline:
spark = SparkSession.builder \
    .appName("Spark NLP")\
    .master("local[*]")\
    .config("spark.driver.memory","16G")\
    .config("spark.driver.maxResultSize", "0") \
    .config("spark.kryoserializer.buffer.max", "2000M")\
    .config("spark.jars", "/tmp/spark-nlp-assembly-6.4.1.jar")\
    .getOrCreate()
- You can download provided Fat JARs from each release notes, please pay attention to pick the one that suits your environment depending on the device (CPU/GPU) and Apache Spark version (3.x)
- If you are local, you can load the Fat JAR from your local FileSystem, however, if you are in a cluster setup you need to put the Fat JAR on a distributed FileSystem such as HDFS, DBFS, S3, etc. (i.e.,
hdfs:///tmp/spark-nlp-assembly-6.4.1.jar)
Example of using pretrained Models and Pipelines in offline:
# instead of using pretrained() for online:
# french_pos = PerceptronModel.pretrained("pos_ud_gsd", lang="fr")
# you download this model, extract it, and use .load
french_pos = PerceptronModel.load("/tmp/pos_ud_gsd_fr_2.0.2_2.4_1556531457346/")\
      .setInputCols("document", "token")\
      .setOutputCol("pos")

# example for pipelines
# instead of using PretrainedPipeline
# pipeline = PretrainedPipeline('explain_document_dl', lang='en')
# you download this pipeline, extract it, and use PipelineModel
PipelineModel.load("/tmp/explain_document_dl_en_2.0.2_2.4_1556530585689/")
- Since you are downloading and loading models/pipelines manually, this means Spark NLP is not downloading the most recent and compatible models/pipelines for you. Choosing the right model/pipeline is on you
- If you are local, you can load the model/pipeline from your local FileSystem, however, if you are in a cluster setup you need to put the model/pipeline on a distributed FileSystem such as HDFS, DBFS, S3, etc. (i.e.,
hdfs:///tmp/explain_document_dl_en_2.0.2_2.4_1556530585689/)
Compiled JARs
Build from source
spark-nlp
- FAT-JAR for CPU on Apache Spark 3.0.x, 3.1.x, 3.2.x, 3.3.x, 3.4.x, and 3.5.x
sbt assembly
- FAT-JAR for GPU on Apache Spark 3.0.x, 3.1.x, 3.2.x, 3.3.x, 3.4.x, and 3.5.x
sbt -Dis_gpu=true assembly
- FAT-JAR for M! on Apache Spark 3.0.x, 3.1.x, 3.2.x, 3.3.x, 3.4.x, and 3.5.x
sbt -Dis_silicon=true assembly
Using the jar manually
If for some reason you need to use the JAR, you can either download the Fat JARs provided here or download it from Maven Central.
To add JARs to spark programs use the --jars option:
spark-shell --jars spark-nlp.jar
The preferred way to use the library when running spark programs is using the --packages option as specified in
the spark-packages section.
OpenVINO
Spark NLP supports inference and model saving using OpenVINO from version 5.4.2, enabling optimized inference for specific models.
OpenVINO is an open-source toolkit for optimizing and deploying deep learning models from cloud to edge. It accelerates deep learning inference across various use cases, such as generative AI, video, audio, and language with models from popular frameworks like PyTorch, TensorFlow, ONNX, and more.
For an example on how to use OpenVINO with Spark NLP, see the examples folder.
Requirements
To run models with OpenVINO, Intel® Threading Building Blocks (Intel® TBB) needs to be available on your system. If not available, you will run into “UnsatisfiedLinkError” exceptions during runtime.
For example, to install TBB on Ubuntu we can run
sudo apt update && sudo apt install libtbb-dev